

Cloudflare is a reverse proxy for your site... It is a versatile product for the security and performance of web pages.
Cloudflare is used by over 12% websites worldwide.
As a user WordPress, adding Cloudflare to your web site can help improve performance and reduce the impact of malicious bots and hackers.
Once properly configured, all requests to your site will go to the Cloudflare server first. It will determine whether the request should be redirected to the origin server, served from the cache, blocked, or processed according to custom rules.
In this guide, we'll take a closer look at optimal Cloudflare settings for WordPress, highlight the difference between Kinsta DNS and Cloudflare DNS, talk about caching and security settings, and show you how to set up Cloudflare for multi-site WordPress installations.
Table of contents:
- Kinsta DNS vs Cloudflare DNS.
- How to configure Cloudflare settings for WordPress.
- Cloudfire Argo and Railgun.
- Cloudflare plugin for WordPress.
- How to configure Cloudflare settings for WordPress Multisite.
Содержание | Быстрая навигация
Kinsta DNS vs Cloudflare DNS.
Before we dive into Cloudflare settings for a WordPress site, let's take a look at the differences between Kinsta DNS and Cloudflare DNS. DNS Kinsta, a premium service included in all of our plans, runs on Amazon Route53. Route53 is an enterprise grade DNS service that offers fast and reliable resolution.
Cloudflare DNS and Kinsta DNS are equally powerful and work flawlessly. The main difference between the two services is the additional security and performance features of Cloudflare. Kinsta DNS is purely a DNS solution, while Cloudflare offers DNS as well as an additional proxy layer. It acts like a firewall, CDN and much more.
If you are a Kinsta customer looking for a DNS-only service, Kinsta DNS is the perfect option. On the other hand, if you're looking for a versatile proxy product, Cloudflare is a good choice.
How to configure Cloudflare settings for WordPress?
Cloudflare offers many security and performance benefits, but not all of them are fully compatible with WordPress. Let's take a closer look at the Cloudflare settings. This will help us determine the best features for your WordPress site. These parameters are:
- SSL;
- Speed;
- Caching;
- Firewall.
Cloudflare supports four SSL / TLS encryption modes:
- "Off" - no encryption;
- Flexibility - encrypts only the connection between the browser and Cloudflare;
- "Full" - end-to-end encryption, but allows a self-signed certificate on the origin server;
- Full (Strict) - End-to-end encryption that requires a free certificate of origin from Cloudflare or a certificate from a trusted CA, CA. We recommend using Full, Full (Strict), SSL mode for maximum security.
For Kinsta customers who would like to use Cloudflare on their WordPress sites, we recommend creating a free Let's Encrypt SSL Certificate on MyKinsta and using the Full or Full (Strict) option on Cloudflare.
Alternatively, you can also create a Cloudflare certificate of origin to install on the source server. If your host does not offer free SSL certificates, installing the original Cloudflare certificate on your server will allow you to use full, strict SSL mode.
If you are using Kinsta to host your site on a subdomain and the root domain uses Cloudflare's flexible SSL, you can use the Cloudflare page rule. Then the subdomain hosted on Kinsta will use Full, Full (Strict) SSL.
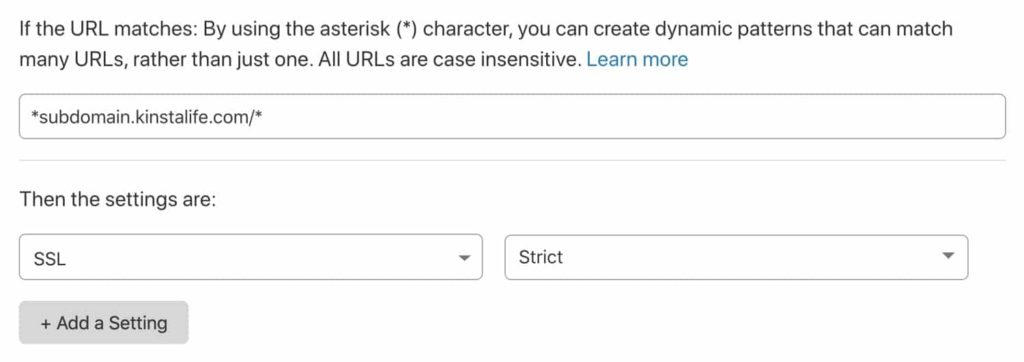
This setting allows flexible Cloudflare SSL while providing full Cloudflare SSL for a subdomain hosted on Kinsta.
Always use HTTPS.
We recommend enabling this option to automatically forward all HTTP requests to HTTPS.
HSTS stands for "HTTP Strict Transport Security" and is used to force the web browser to use secure HTTPS connections. Enabling HSTS on Cloudflare ensures that HTTP requests never reach your origin server. If your site is already configured to use HTTPS, we recommend that you also configure HSTS on the origin server.
Minimum TLS version.
TLS, Transport Layer Security, is a cryptographic protocol that enables secure transmission of data over a network.
By default, Cloudflare installs TLS 1.0 for the protocol version. Certain security standards, such as PCI DSS 3.2, require more recent versions of TLS to be compliant. If your site requires a specific version of TLS, you can change the setting by going to SSL / TLS> Edge Certificates> Minimum TLS Version.
Automatic rewriting of HTTPS.
This function checks the URLs of the HTTP resources in your HTML code. This determines if they are available over HTTPS. If so, they will be automatically rewritten with the HTTPS variation. HTTPS auto-rewrite is useful for providing secure browsing without confusing content errors.
Keep your website safe with the correct Cloudflare settings.
Most of Cloudflare's performance-related settings such as asset minification and image optimization can be found under the Speed tab.
Image resizing for business projects.
Cloudflare's image resizing feature is only available to business plan users. If implemented correctly in your WordPress theme, this feature can be used to upload thumbnails of images to Cloudflare. This has several advantages over WordPress' built-in thumbnail creation feature.
For sites that dynamically generate image sizes on the fly, using Cloudflare's image resizing feature can reduce CPU usage.
This allows your site to serve more users at the same time without increasing CPU resources. Resizing images in cloud storage also helps reduce disk space usage.
Image resizing in Cloudflare is done by adding an endpoint to your images. Take a look at the example below that shows how this feature works.
Source Image URL:
https://yourdomain.com/wp-content/uploads/2020/01/picture.jpg
URL of the modified image:
https://yourdomain.com/cdn-cgi/image/fit=contain,format=auto,metadata=none,onerror=redirect,quality=70,width=720/https://yourdomain.com/wp-content/ add / 2020/01 / picture.jpg
The "width" parameter can be adjusted to dynamically create different thumbnail sizes without additional load on your origin server. If you're looking for a standalone service similar to Cloudflare's image resizing feature, then Imgix and Cloudinary are great options.
"Polish" for professionals.
Cloudflare Polish is an image optimization service that automatically compresses JPG, PNG, GIF and other image files. They are processed at the edge of Cloudflare.
This means there are no performance issues on the server that hosts your WordPress site. Polish also supports the Google WEBP format. Optimized WEBP images will be automatically provided in Chrome, Brave and other browsers that support this format.
Polish is a useful feature for WordPress sites for several reasons. If you use an image optimization plugin like ShortPixel or Imagify, Polish can significantly reduce your server's CPU load. This can lead to a more stable Internet experience for visitors.
Since the images optimized for Polish are stored and cached outside the server, you don't need to worry about using disk space to store WEBP versions of your images.
Auto Minify.
Cloudflare's auto minify feature minimizes cached CSS, JSS and HTML resources as much as possible. If you are not minifying resources with a WordPress plugin like Autoptimize or WP-Rocket, we recommend enabling the auto minify feature in Cloudflare.
Brotli.
Brotli is an alternative to GZIP, a compression algorithm that reduces the size of web requests before they are delivered to visitors.
Compared to GZIP, Brotli offers a higher compression ratio. This results in faster page loading for users.
The problem is that not all web browsers support Brotli compression. In any case, we recommend enabling the Cloudflare Brotli feature. Requests from unsupported browsers will simply fallback to GZIP compression.
Improved HTTP / 2 prioritization for Pro.
The introduction of HTTP / 2 has led to significant increases in website performance through parallelization and multiplexing. Cloudflare's enhanced HTTP / 2 Priority feature takes it one step further.
It intelligently parses the HTML of your website. This is how you determine the order in which resources are loaded to achieve the best performance. According to Cloudflare, improved HTTP / 2 prioritization can reduce page load times by up to 50%.
Mirage for professionals.
Mirage is an image optimization feature designed for mobile and low-speed connections.
When Mirage is enabled, images are replaced with low resolution placeholders during page initial load. After it loads, the full resolution image pages are loaded with lazy loading.
Mirage can also combine multiple image requests into a single request, which reduces the number of round trips required to fully load a page.
If your site uses a lot of images and targets mobile demographic pressure, Cloudflare Mirage can have a positive impact on performance.
Rocket Loader.
Rocket Loader is a feature that speeds up the loading time of JavaScript resources by loading them asynchronously.
This effectively reduces the render-blocking content of the page, allowing the page to load faster. We recommend testing your site with Rocket Loader enabled to see if it improves your page speed. If your WordPress site depends on loading JavaScript resources in a specific order, you can bypass the Rocket Loader by adding the data-cfasync = "false" attribute to the script tag.
Caching.
By default, Cloudflare caches static assets like CSS, JS, and image files. Please note that Cloudflare does not cache your site's generated HTML by default.
Caching level.
We recommend that you leave the caching level at "Standard", which allows you to access updated versions of resources using a unique query string.
The expiration date of the browser cache.
For sites hosted on Kinsta, we recommend setting the browser cache expiration setting to Respect Existing Headers. This will keep the static resources in the browser cache for one year. If you would like to change this with a shorter expiration date, feel free to change this setting.
Firewall.
At Kinsta, we use an enterprise-grade Google Cloud Platform firewall to protect WordPress sites from malicious traffic. Kinsta customers have access to the IP Deny tool on the MyKinsta dashboard to block specific IP addresses.
If your host doesn't offer a custom firewall, Cloudflare's free plan includes a basic firewall that allows five custom rules. Firewall rules can be configured to block specific IP addresses, user agents, request methods, HTTP links, and even countries.
For example, you notice that your WooCommerce store is receiving a lot of fake orders from a country outside of your target market. You can use Cloudflare's free firewall to block traffic from all over the country.
The Pro Cloudflare plan includes a more robust Web Application Firewall (WAF). WAF offers specialized, managed rulesets to help protect your site even more. For example, there are rulesets designed for WordPress and PHP sites. For example:
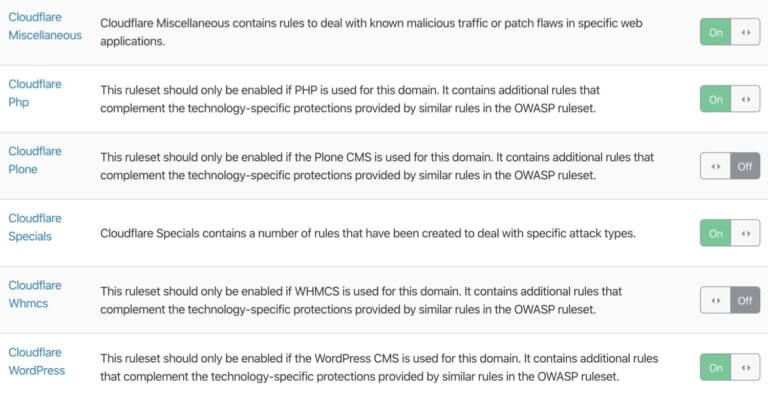
For most WordPress sites, the level of security offered by the free Cloudflare plan is sufficient. However, if you are running a mission-critical business site that requires more security, WAF and Cloudflare's managed rulesets can help further secure your site.
Network.
In the Cloudflare Network settings, we recommend enabling HTTP / 2, HTTP / 3 (with QUIC) and 0-RTT connection resume.
As we mentioned earlier, HTTP / 2 brings several improvements to HTTP / 1.1 through parallelization and multiplexing. Likewise, HTTP / 3 extends the performance of HTTP / 2 even further by using a new UDP-based protocol called QUIC instead of traditional TCP.
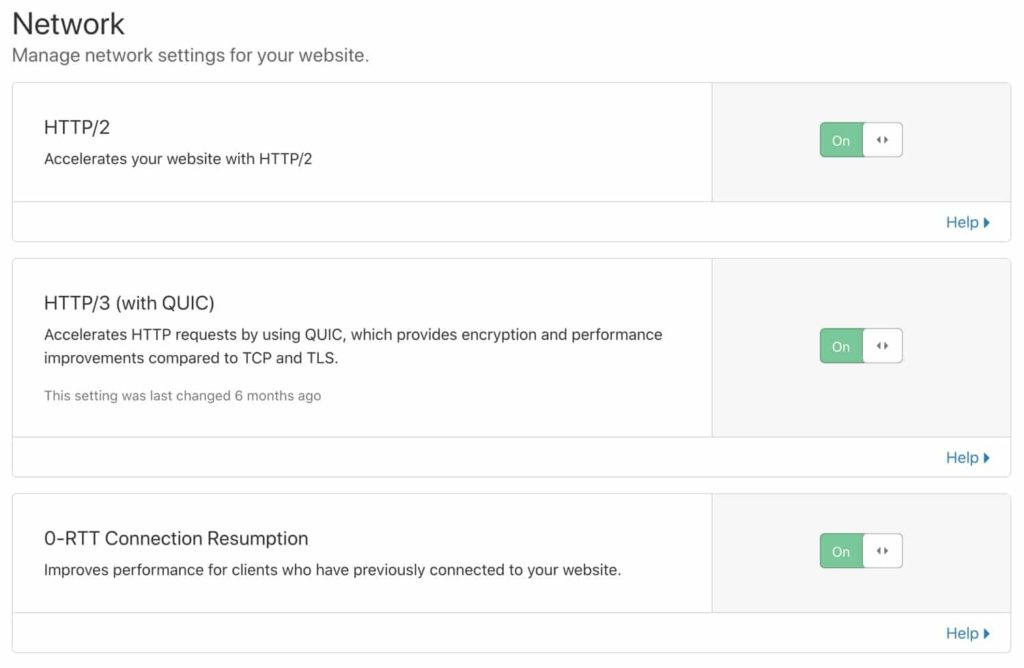
Description to Image: Enable HTTP / 2, HTTP / 3 and 0-RTT connection renewal.
Secure HTTP / 3 connections also benefit from an optimized handshake. It leads to faster connection times. When HTTP / 3 is enabled on your Cloudflare dashboard, supported clients will be able to use HTTP / 3 to connect to Cloudflare servers.
Finally, Cloudflare's 0-RTT resume feature shortens the download times of visitors who have previously connected to your website.
Page rules.
The Cloudflare Page Rules feature allows you to customize settings for specific URLs. Page rules are useful for disabling caching for specific resources, changing the security level for a selected page, and more.
One of the more popular use cases for page rules is to configure Cloudflare to “cache everything”.
Cache HTML using Cloudflare Page Rule.
Cloudflare only caches static assets like CSS, JS and image files. As a security measure, Cloudflare does not cache HTML by default. WordPress and other CMS-based sites are dynamic in the sense that they require administration in a secure server environment. With HTML caching enabled, these secure server pages will be cached and made visible to anyone who logs on or off.
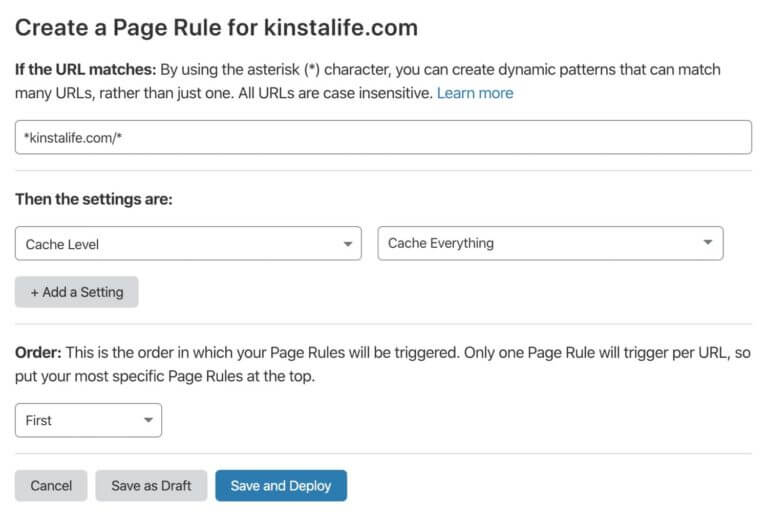
In Cloudflare, you can configure all caching options by adding a wildcard page rule covering the entire site: * kinstalife.com / * With the cache all feature enabled, Cloudflare will cache your site's HTML pages across your entire datacenter network worldwide.
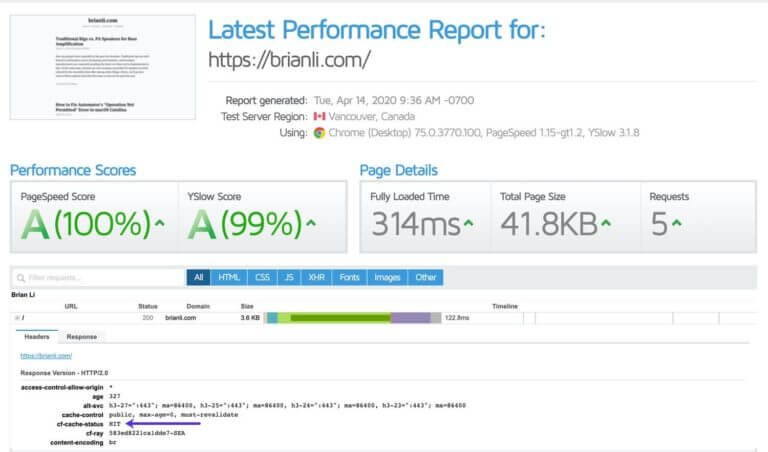
Description to image: site with everything caching enabled - pay attention to the cf-cache-status header.
In general, we don't recommend configuring Cloudflare to cache everything unless your site is static. For example, most sites created by static site generators like Gatsby and Hugo do not have dynamic functionality that can break when cached full page.
How to bypass the cookie cache?
That being said, it's certainly possible to tweak Cloudflare's settings to cache everything on your WordPress site. The Cloudflare Business Plan allows you to create page rules that bypass the cache for specific cookies.
By changing your Cloudflare settings to bypass the WordPress WordPress cookie, login requests will not be cached. Likewise, bypassing the cache for cookies like woocommerce_items_in_cart and wp_woocommerce_session_ is useful for WooCommerce sites.
Specifying the Cache-Control headers.
Another option for selectively bypassing the Cloudflare cache is to use PHP to add cache control response headers when a certain condition is met. For this method to work, you need to enable source caching controls in your cache all page rule.
Enabling source cache control will force Cloudflare to respect the response headers from your web server (like Nginx) and backend application (like PHP and WordPress). To prevent Cloudflare from caching certain pages, the below response headers can be added to WordPress theme template files. In addition, the code can also be adapted to work in your functions.php file
Enabling source cache control will force Cloudflare to respect the response headers from your web server like Nginx and backend application like PHP and WordPress. To prevent Cloudflare from caching certain pages, the below response headers can be added to WordPress theme template files. In addition, the code can also be adapted to work in your functions.php file.
If this code is added to the top of your single.php file, Cloudflare will not cache your individual posts and pages. This code can also be wrapped in logical statements to run under certain conditions. For example, using this code with the is_user_logged_in () function will ensure that Cloudflare will not cache pages for logged in users.
As an example, we have added the below code to our header.php file. This PHP code will add cache control and pragmatic response headers to all of our pages when the user is logged in.
By examining the login response headers, we can see this.
Cache-Control: no-store, no-cache, must-revalidate, max-age = 0 Cache-Control: post-check = 0, pre-check = 0 CF-Cache-Status: BYPASS CF-RAY: 588140b43a4f74a7-IAD cf-request-id: 0244a6c4a0000074a7bdb0e200000001 Connection: keep-alive Content-Encoding: gzip Content-Type: text / html; charset = UTF-8 Date: Wed, 22 Apr 2020 18:01:54 GMT Expires: Wed, 11 Jan 1984 05:00:00 GMT Link: ; rel = "https://api.w.org/" Pragma: no-cache Server: cloudflare Transfer-Encoding: chunked Vary: Accept-Encoding X-Content-Type-Options: nosniff X-Kinsta-Cache: BYPASSViewing the same page as the logged out user gives these response headers.
Some of the world's largest brands and industries use Kinsta's Enterprise WordPress Hosting. From startups to agencies and Fortune 500 companies. Ready to get started?
Age: 5 CF-Cache-Status: HIT CF-RAY: 5881420dad7d74a7-IAD cf-request-id: 0244a79c8d000074a7bd820200000001 Connection: keep-alive Content-Encoding: gzip Content-Type: text / html; charset = UTF-8 Date: Wed, 22 Apr 2020 18:02:49 GMT Link: ; rel = "https://api.w.org/" Server: cloudflare Transfer-Encoding: chunked Vary: Accept-Encoding X-Content-Type-Options: nosniff X-Kinsta-Cache: BYPASSAs you can see, there is a CF-Cache-Status: HIT header that indicates that the page is being served from the Cloudflare cache.
If you are interested in setting up an everything caching feature for your WordPress site, we recommend that you work with a developer with experience with both Cloudflare and WordPress.
This will help determine if it is better to use cookie-based crawls or server-side cache control header generation for your WordPress site.
In some cases, both methods may need to be implemented at the same time.
Cloudfire Argo and Railgun.
Cloudflare offers complementary high performance products. They can help further improve the performance of your WordPress site. These features come at extra cost, but are worth looking into if you're ready to go the extra mile optimizing your site.
Argo.
Argo is a Cloudflare add-on service that provides smart routing for your site. With Argo enabled, traffic is directed around congested areas on the Cloudflare network.
In our tests, Argo reduced page load times by 20-30%. If you are a Cloudflare user and want to do your best to optimize performance, experimenting with Argo can bring positive results.
Railgun.
Railgun by Cloudflare is a WAN product that establishes a secure tunnel between your server and Cloudflare servers.
Railgun is designed to speed up the delivery of uncached content. It only provides a general difference between requests. For example, if page A and B have identical header and footer structures with different body content, Railgun will be aware of this. The service will only handle differences over a highly compressed binary data stream.
Railgun is only available for Cloudflare business plans and requires your web host to install additional software on your website server. For most users, Railgun acceleration is not required to maintain fast download times from Cloudflare.
However, if you're running a WooCommerce store or forum with a lot of traffic that can't be cached, Railgun can potentially help boost your site's speed.
Cloudflare plugin for WordPress.
The Cloudflare team maintains the official WordPress plugin. While this plugin is not an absolute requirement, it does provide some useful features:
- WordPress-optimized Cloudflare settings,
- sets of security rules for WordPress,
- automatic cache clearing, HTTP / 2 server submission, and more.
For advanced users, we recommend not installing the plugin, but adjusting the settings in the Cloudflare dashboard. This avoids conflicts with custom page rules.
How to configure Cloudflare settings for WordPress Multisite.
If you're using Cloudflare with a WordPress multisite, there are a few caveats to consider when setting up:
- SSL configuration.
To demonstrate the correct Cloudflare SSL setup for a WordPress multisite, we created a test multisite subdomain. SSL problems won't be if you are using a multisite subdirectory.
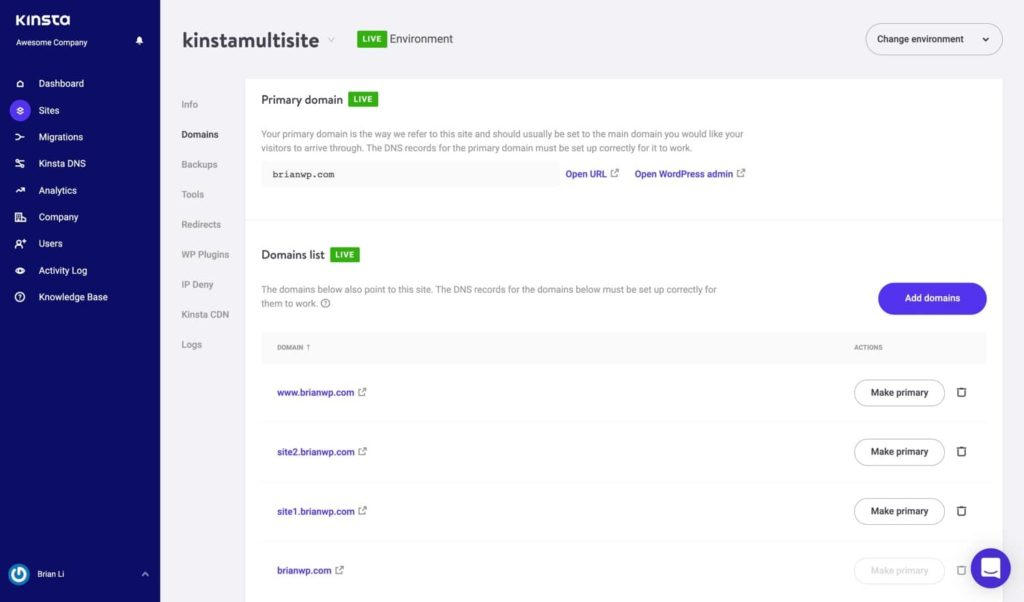
Here's the structure of our test WordPress subdomain for multiple sites:
- The main site is brianwp.com and www.brianwp.com.
- Subsite 1 is site1.brianwp.com.
- Subsection 2 - site2.brianwp.com.
We've added multisite domains to MyKinsta.
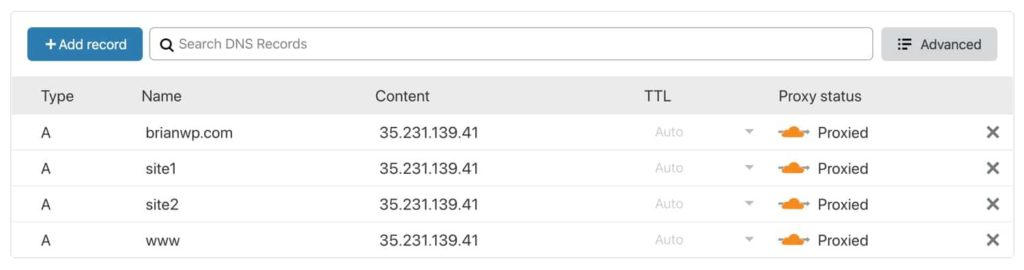
Likewise, domains have been configured with corresponding A records in Cloudflare. The Cloudflare proxy has also been enabled, as indicated by the orange cloud icon.
To use Cloudflare in full (strict) SSL mode, all linked domains must be present in the source server's SSL certificate. There are two ways to do this.
2. Encryption or Pay for SSL.
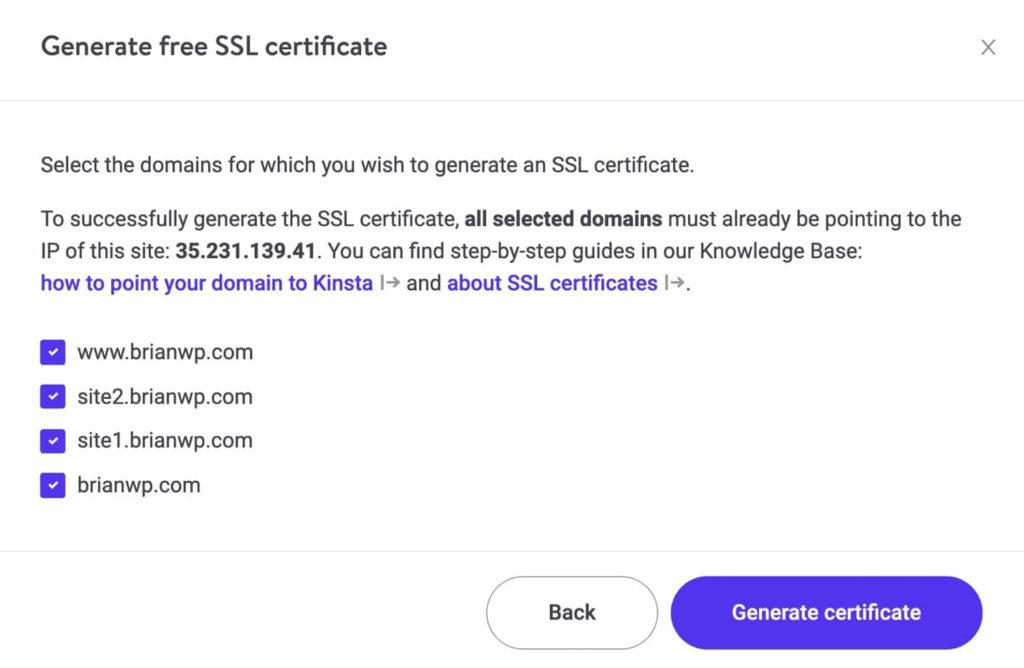
If your host supports the free Let's Encrypt SSL, create an SSL certificate that will cover all of your multisite domains.
On Kinsta, it is easy to create an SSL certificate for all your domains using our Let's Encrypt tool in the MyKinsta dashboard.
3. Cloudflare Origin SSL Certificate.
Alternatively, you can create a Cloudflare origin SSL certificate that spans your multi-site domains. To generate a certificate of origin, go to SSL / TLS> Origin Server and click Generate Certificate.
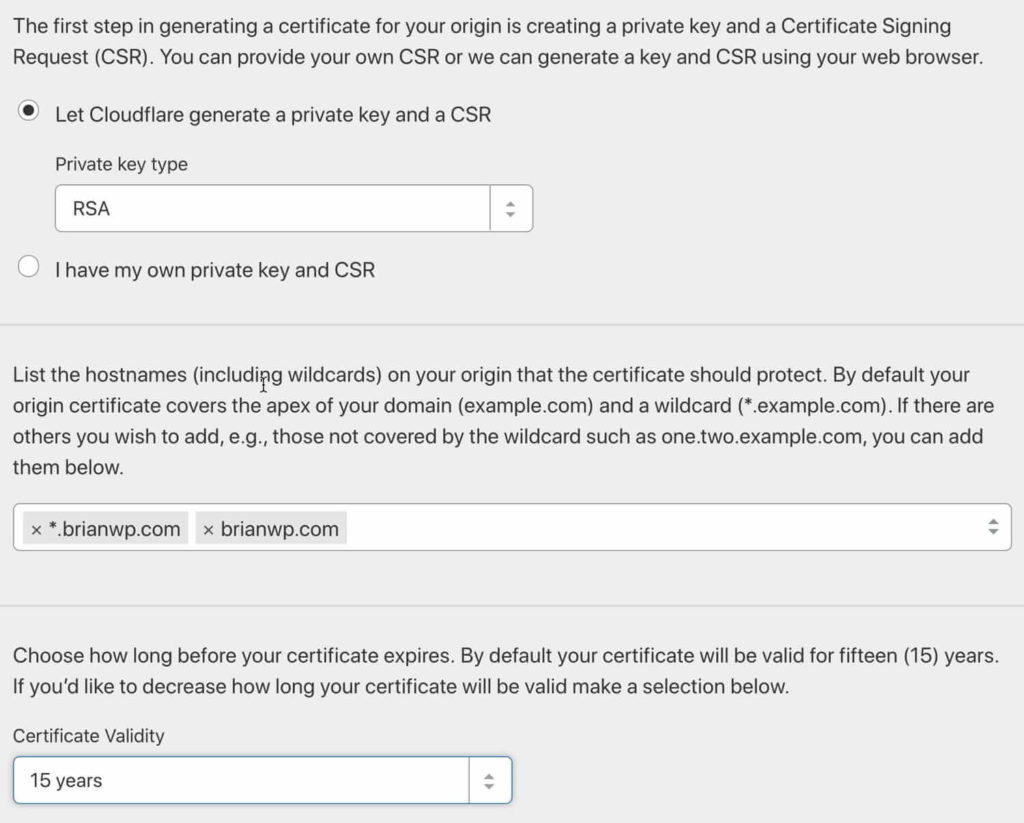
The menu for generating a certificate of origin is divided into three sections. In the first section, select “Allow Cloudflare to generate private key and CSR”. You can do this unless you have a specific reason to provide your own credentials.
In the second section, enter the domains and subdomains that need to be secured with an SSL certificate. You can only create certificates for domains that are in your Cloudflare account.
Finally, in the third section, select the expiration date for the certificate.
After setting up a proper SSL certificate that includes all of your multi-site domains, you should be able to use Cloudflare in the recommended full (strict) SSL mode. If in the future you need to add additional domains or subdomains to your multisite, be sure to create a new SSL certificate. It will cover additional domains.
Page rules for WordPress multisite.
Other security and performance features of Cloudflare apply to all subdomains of your root domain. In other words, if CSS minification is enabled for our main site, brianwp.com, it will also be enabled for site1.brianwp.com and site2.wpbrianli.com.
This default behavior can cause problems in certain situations. For example, you might not want to turn off HTML, CSS, and JS optimizations globally just because it is incompatible with one child site. To work around this issue, you can use custom page rules to selectively disable features for specific subdomains.
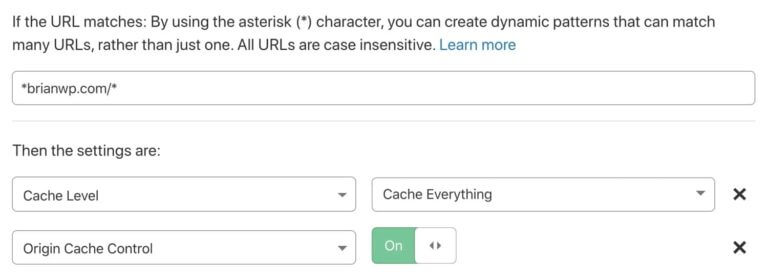
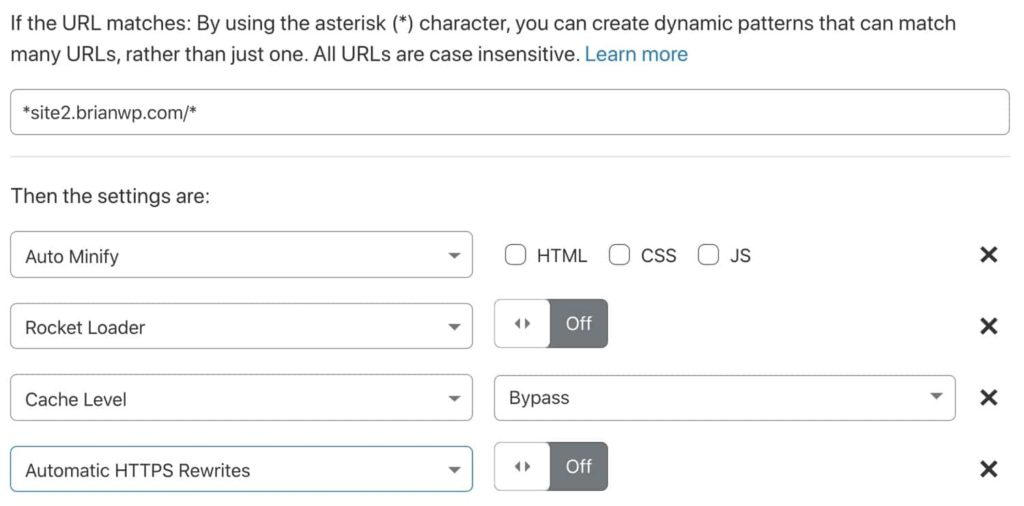
In the example below, we have configured a page rule targeting * site2.brianwp.com / *. The * character is used to indicate wildcard behavior.
For this page rule, we disabled auto minify HTML, CSS and JS, disabled Rocket Loader, bypassed the Cloudflare cache, and disabled auto rewrite HTTPS.
If you're using the free Cloudflare plan, keep in mind that it only comes with three page rules. If you need to make custom settings on multiple subsites, you need to upgrade to the Pro plan or purchase additional page rules.
Looking to improve website performance and reduce the number of bots and hackers? These Cloudflare settings are perfect for WordPress users!
Bottom line.
Knowing how to configure Cloudflare settings for your WordPress site and how to properly integrate with your hosting stack can positively impact your site's speed and security.
Whether you are a one-person store or a full-service agency with hundreds of customers, Cloudflare is a security and performance service that offers tremendous value. When combined with WordPress, there is the right path and incredibly fast hosting, the fun begins.
If you liked this article, then you will love the Kinsta WordPress hosting platform. Upgrade your website and get 24/7 support from our experienced WordPress team!
Based on materials from the site: kinsta.com.
✔️ What is a DDOS attack?
This is a traffic disruption to a network server by multiple computer systems. They block its flow in the same way that cars create traffic jams on the road.
✔️ What is CDN?
It is a content delivery network that is provided by a group of servers.
✔️ Is CDN the same as web hosting?
CDN does not replace web hosting. It is a tool that helps cache content at the edge of the network, which improves website performance.
✔️ What is DNS flood?
This is a DNS flood caused by attackers. The website stops responding to valid traffic.
✔️ How do I add a CDN to my WordPress site?
Log into your WordPress admin panel. Go to CDN Enabler settings. Update your CDN hostname setting with the zone alias (for example, cdn.example.com) or the zone URL (for example, example-1a2b.kxcdn.com). Click "Save Changes" and "Confirm Configuration".
✔️ How to use Cloudflare as a CDN?
Follow the simple instructions.
Create a Cloudflare account and add your website. First, go to the Cloudflare homepage and click the Sign Up button at the top of the screen.
Upgrade your domain name servers and choose a plan.
Check your Cloudflare security settings.
✔️ How can I create a CDN for my site?
Choose a CDN and register your site.
Create a CDN url.
Send your assets to CDN.


1 thought on “Cloudflare для WordPress. Как настроить CDN для сайта?”